Baiklah kali ini pengguna netbook lovers bisa menginstall Windows Xp Mereka tanpa menggunakan DVD External karena kali ini saya akan share ke netbook lover, bagaimana cara instal WIN XP ke netbook dengan menggunakan USB Flashdisk. Sebelum mulai download dulu software pendukungnya
Anda juga memerlukan Flasdisk Min 1 Gb. Dan tentunya Windows XP sendiri.
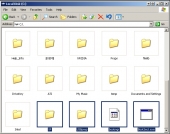
Setelah Anda download softwarenya, ekstrak file USBPrep ke folder C: Setelah itu Ekstrak file PeToUSB ke dalam folder USBPrep. Ingat taruh di partisi C:
Kemudian backup CD Windows XP ke folder C: dengan nama folder yang mudah diingat
Navigate to the USBprep folder in C:\ and double click the usb_prep8.cmd file (yours may or may not have the .cmd extension based on the Windows settings you are using. You can enable file extensions by clicking Tools, Folder Options, View tab, then unticking "Hide extensions for known file types" in the Advanced Settings list).
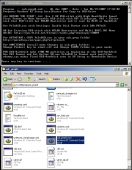
Clicking usb_prep8.cmd opens up the black and white command screen you see above. Follow the directions on-screen by clicking any button and you will be greeted with another window, PeToUSB. If you have your flash drive plugged in, the program should detect it and list it under the destination drive.
Click "Start" in the PeToUSB window, select "Yes" to continue then again click "Yes" when it asks if you are sure you want to repartition and format the disk. Once complete, click "Ok".

Leave all of these windows open and go to "Start", then "Run" and type in "cmd" to bring up the console window.
Type "cd c:\", without the quotes and press Enter.
Now type "bootsect /nt52 M:", without the quotes. In this example, "M" represents the letter of my flash drive. Yours will likely be different so be sure to check beforehand (it should be listed beside your device name in PeToUSB - if not there, simply double click My Computer on your desktop and locate the drive letter there.) then press Enter.
The command window will inform you that Bootcode was successfully updated on all target volumes.


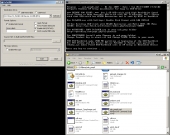
Now, close out of the current command window and also close PeToUSB. Doing this will bring up a new set of options in the original command window, as seen above.
Press "1" then Enter and you will be asked to browse to the folder that you copied Windows to. Select the folder then click "OK".
Click back on the command window and press "2" then Enter. You will be asked to enter a drive letter that is not already taken. You may want to check in My Computer to be sure you select a letter that isn't already being used. In the screenshot above, I selected "O". Press Enter after selecting your drive letter of choice.
Press "3" then Enter and you will be asked for the drive letter of your flash drive. This is the same letter that you used earlier in bootsect. For me, that letter is "M". Input the letter and press Enter.


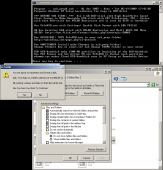
Finally, press "4" then Enter. You will be asked if you want to proceed with the format. Type "Y" then press Enter.
The system will pause a moment while the format takes place. Then you will be asked to press any key to continue... do so. This starts the first phase of the process which will take a few minutes.
Once again, you will be prompted to press any key to continue... do so. Another dialog box will pop up, asking you if you want to start the file copy. Click "Yes". The command window will again activate and start copying files to the flash drive which will take a few minutes.


After a bit, you will be asked if you would like USB-stick to be Preferred Boot Drive. Click "Yes".
Finally, a dialog box asks if you would like to unmount the Virtual Drive. Click "Yes".
That's it, you are done! You can close the command window and any other relevant windows that may still be open.
But, we are not done. Now comes time to install XP, which as you will find out, is a bit of a different process when using a flash drive. Continue ahead as we walk through this procedure.
Installing XP
Once you have your flash drive loaded with XP, it's time to install it. As mentioned earlier, you need to be sure that your computer supports booting from a USB drive.

Plug in the flash drive then turn on the computer and go into the BIOS (usually by pressing the Delete key at the POST screen). In the BIOS, you will need to set the flash drive as the first boot device, usually called something like "USB Hard Drive". Save and exit to reboot the system.

You will be greeted with the screen you see above which gives you two options: TXT mode or GUI mode. Select TXT mode for now.

Setup will load as normal, but there is one catch that you need to be aware of here. If you are formatting your hard drive and creating a new partition, you will need to turn off the computer immediately after the partition has been formatted (before Windows starts copying files over). Turn the system back on, boot back into TXT mode then direct Windows to leave the current file system intact. This is done because the flash drive can't copy to the new partition unless the computer is restarted and the flash drive is allowed to recognize the new partition. Strange, yes, but that's just how it works. If you aren't creating a new partition, then just carry on as usual.

Once all of the setup files are loaded, the computer will reboot. This time, select GUI mode and continue your installation as you normally would with a CD. It is important that you don't remove the flash drive until you are totally finished with the installation or you may corrupt the install and have to start over again.

This guide should allow you to quickly and easily install Windows XP on a computer without an optical drive such as a netbook. You can, however, use this method on any computer to speed up the installation process, as it is much faster to install from a flash drive versus an optical drive.
Source:http://www.ocia.net/articles/xpflashdrive/page1.shtml
Kemudian backup CD Windows XP ke folder C: dengan nama folder yang mudah diingat
Navigate to the USBprep folder in C:\ and double click the usb_prep8.cmd file (yours may or may not have the .cmd extension based on the Windows settings you are using. You can enable file extensions by clicking Tools, Folder Options, View tab, then unticking "Hide extensions for known file types" in the Advanced Settings list).
Clicking usb_prep8.cmd opens up the black and white command screen you see above. Follow the directions on-screen by clicking any button and you will be greeted with another window, PeToUSB. If you have your flash drive plugged in, the program should detect it and list it under the destination drive.
Click "Start" in the PeToUSB window, select "Yes" to continue then again click "Yes" when it asks if you are sure you want to repartition and format the disk. Once complete, click "Ok".
Leave all of these windows open and go to "Start", then "Run" and type in "cmd" to bring up the console window.
Type "cd c:\", without the quotes and press Enter.
Now type "bootsect /nt52 M:", without the quotes. In this example, "M" represents the letter of my flash drive. Yours will likely be different so be sure to check beforehand (it should be listed beside your device name in PeToUSB - if not there, simply double click My Computer on your desktop and locate the drive letter there.) then press Enter.
The command window will inform you that Bootcode was successfully updated on all target volumes.
Now, close out of the current command window and also close PeToUSB. Doing this will bring up a new set of options in the original command window, as seen above.
Press "1" then Enter and you will be asked to browse to the folder that you copied Windows to. Select the folder then click "OK".
Click back on the command window and press "2" then Enter. You will be asked to enter a drive letter that is not already taken. You may want to check in My Computer to be sure you select a letter that isn't already being used. In the screenshot above, I selected "O". Press Enter after selecting your drive letter of choice.
Press "3" then Enter and you will be asked for the drive letter of your flash drive. This is the same letter that you used earlier in bootsect. For me, that letter is "M". Input the letter and press Enter.
Finally, press "4" then Enter. You will be asked if you want to proceed with the format. Type "Y" then press Enter.
The system will pause a moment while the format takes place. Then you will be asked to press any key to continue... do so. This starts the first phase of the process which will take a few minutes.
Once again, you will be prompted to press any key to continue... do so. Another dialog box will pop up, asking you if you want to start the file copy. Click "Yes". The command window will again activate and start copying files to the flash drive which will take a few minutes.
After a bit, you will be asked if you would like USB-stick to be Preferred Boot Drive. Click "Yes".
Finally, a dialog box asks if you would like to unmount the Virtual Drive. Click "Yes".
That's it, you are done! You can close the command window and any other relevant windows that may still be open.
But, we are not done. Now comes time to install XP, which as you will find out, is a bit of a different process when using a flash drive. Continue ahead as we walk through this procedure.
Installing XP
Once you have your flash drive loaded with XP, it's time to install it. As mentioned earlier, you need to be sure that your computer supports booting from a USB drive.
Plug in the flash drive then turn on the computer and go into the BIOS (usually by pressing the Delete key at the POST screen). In the BIOS, you will need to set the flash drive as the first boot device, usually called something like "USB Hard Drive". Save and exit to reboot the system.
You will be greeted with the screen you see above which gives you two options: TXT mode or GUI mode. Select TXT mode for now.
Setup will load as normal, but there is one catch that you need to be aware of here. If you are formatting your hard drive and creating a new partition, you will need to turn off the computer immediately after the partition has been formatted (before Windows starts copying files over). Turn the system back on, boot back into TXT mode then direct Windows to leave the current file system intact. This is done because the flash drive can't copy to the new partition unless the computer is restarted and the flash drive is allowed to recognize the new partition. Strange, yes, but that's just how it works. If you aren't creating a new partition, then just carry on as usual.

Once all of the setup files are loaded, the computer will reboot. This time, select GUI mode and continue your installation as you normally would with a CD. It is important that you don't remove the flash drive until you are totally finished with the installation or you may corrupt the install and have to start over again.
This guide should allow you to quickly and easily install Windows XP on a computer without an optical drive such as a netbook. You can, however, use this method on any computer to speed up the installation process, as it is much faster to install from a flash drive versus an optical drive.
Source:http://www.ocia.net/articles/xpflashdrive/page1.shtml

3 komentar:
test
seeep
tp sayang msh B.Inggris
coz kebanyakan orang kita suka yg B.Indonesia
ato ksh menu language d blog u..
Test......ehm berhasil he..he...
melanjutkan koment dari mas Dar,justru saya setuju dengan bahasa inggris sekalian buat belajar he..he...siip mas Arif...oh iya dah saya follow kalo sediia follow balik buat saya test....eh thnxs ha..ha...good luck
Posting Komentar